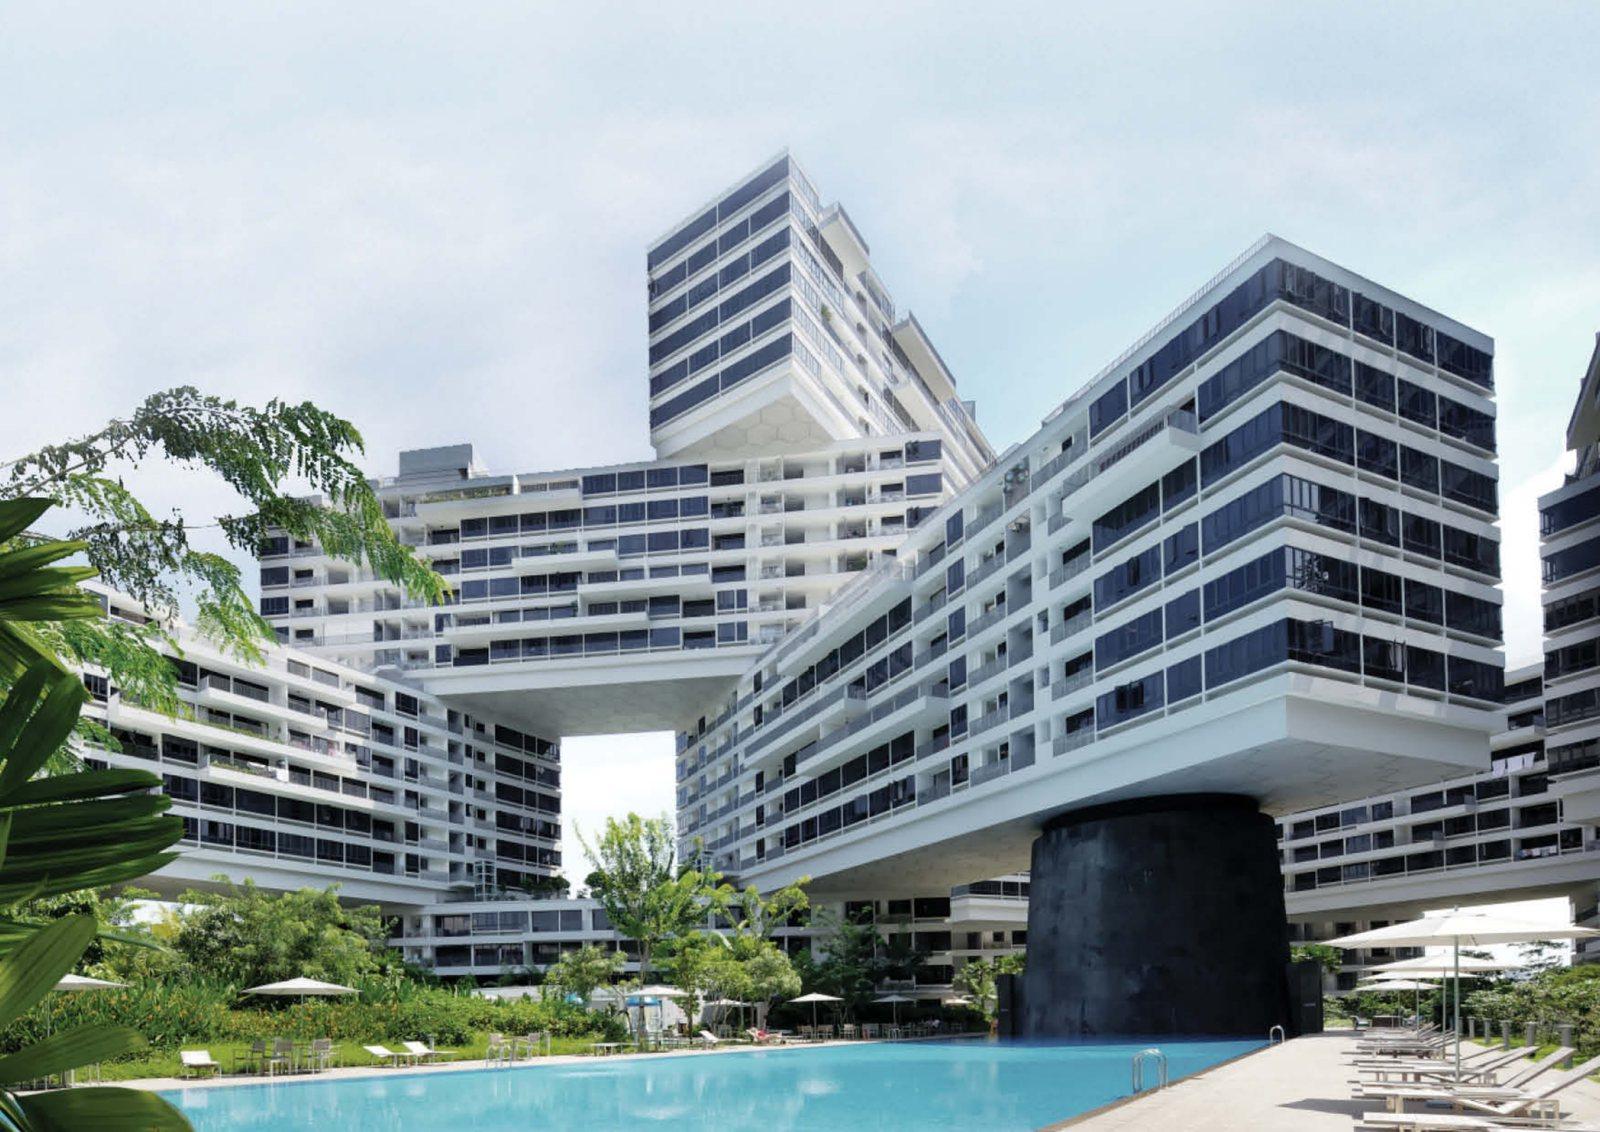
The Interlace
District 4 · 1,040 homes · 99-year leasehold · Resale · completed 2013
Photo: Ankerite Pte Ltd, CapitaLand Designer Series brochure
All 258 stacks of The Interlace (180 to 226 Depot Road) in 3D on the real map, beside the buildings around them at their real heights. Pick a stack and a storey to see its facing, its view and its hours of sun. Recent sale prices, rent and its grade are on the The Interlace resale scorecard.
Coolest stacksEvery stack ranked by direct sun after 2pm, least first.OpenHide
Working out every stack…
How to read the map and the colours
The Interlace in brief
- Least afternoon sun
- Stacks #05 (storey 12), #05 (storeys 7 to 11), #06 (storey 12), #06 (storeys 7 to 11), #08 (storey 3), #08 (storey 13) and 169 more: under an hour of direct sun after 2pm in every month.
- Clear view
- Stacks #02, #04 (storey 12), #04 (storeys 8 to 11), #05 (storey 6), #05 (storeys 3 to 5), #07 and 79 more: no building as tall as the window within 400 m.
- Blocked view
- Stacks #01 (storey 6), #01 (storeys 3 to 5), #03 (storey 6), #03 (storeys 3 to 5), #04 (storeys 3 to 6), #05 (storey 12) and 246 more: face Block 226, Block 186, Block 218 and 21 more, as tall as the stack or taller.
Read at the middle storey of each stack. The tool above shows any storey.
Every stack at a glance
Show the table of all 258 stacksHide the table
Computed for the middle storey of each tower (storey 3 in the 6-storey blocks, storey 6 in the 12-storey blocks, storey 9 in the 18-storey blocks, storey 12 in the 24-storey blocks), or the middle of its own storeys for a stack that does not have that storey. Sun columns are hours of direct sun on the window on 21 June and 21 December after shading by other buildings; “Afternoon sun” lists the months with an hour or more after 2pm. Open the tool for any other storey or date.
Block 180 · 6 storeys · 3 stacks
Block 182 · 12 storeys · 10 stacks
Block 184 · 18 storeys · 14 stacks
Block 186 · 24 storeys · 12 stacks
Block 188 · 24 storeys · 15 stacks
Block 190 · 18 storeys · 14 stacks
Block 192 · 18 storeys · 13 stacks
Block 194 · 12 storeys · 12 stacks
Block 196 · 6 storeys · 6 stacks
Block 198 · 18 storeys · 15 stacks
Block 200 · 18 storeys · 13 stacks
Block 202 · 6 storeys · 5 stacks
Block 204 · 12 storeys · 11 stacks
Block 206 · 18 storeys · 15 stacks
Block 208 · 18 storeys · 13 stacks
Block 210 · 12 storeys · 11 stacks
Block 212 · 12 storeys · 12 stacks
Block 214 · 18 storeys · 14 stacks
Block 216 · 24 storeys · 12 stacks
Block 218 · 24 storeys · 12 stacks
Block 220 · 24 storeys · 9 stacks
Block 222 · 24 storeys · 10 stacks
Block 226 · 12 storeys · 7 stacks
Frequently asked questions
Which The Interlace stacks avoid the afternoon sun?
48 stacks get under an hour of direct sun after 2pm, every month of the year.
- #05 (storey 12)
- #05 (storeys 7 to 11)
- #06 (storey 12)
- #06 (storeys 7 to 11)
- #08 (storey 3)
- #08 (storey 13)
- #08 (storey 18)
- #08 (storeys 5 to 6)
- #08 (storeys 14 to 16)
- #09 (storeys 7 to 12)
- #10
- #13 (storey 3)
- #13 (storeys 4 to 6)
- #13 (storeys 13 to 14)
- #13 (storeys 15 to 18)
- #14 (storey 19)
- #15 (storey 2)
- #15 (storey 13)
- #15 (storeys 3 to 6)
- #15 (storeys 14 to 18)
- #16 (storey 3)
- #16 (storey 19)
- #17 (storey 4)
- #17 (storey 18)
- #17 (storeys 5 to 6)
- #17 (storeys 13 to 14)
- #17 (storeys 15 to 17)
- #20 (storey 4)
- #20 (storeys 5 to 6)
- #20 (storeys 13 to 14)
- #20 (storeys 15 to 18)
- #23 (storey 12)
- #23 (storeys 4 to 6)
- #23 (storeys 7 to 9)
- #23 (storeys 10 to 11)
- #23 (storeys 13 to 14)
- #23 (storeys 15 to 18)
- #24 (storeys 7 to 12)
- #27 (storey 12)
- #27 (storeys 7 to 11)
- #28 (storey 12)
- #28 (storeys 7 to 9)
- #28 (storeys 10 to 11)
- #34 (storey 4)
- #34 (storey 5)
- #34 (storey 6)
- #34 (storey 18)
- #34 (storeys 13 to 14)
- #34 (storeys 15 to 17)
- #35 (storey 2)
- #35 (storey 3)
- #36 (storey 6)
- #36 (storey 13)
- #36 (storey 18)
- #36 (storeys 3 to 4)
- #36 (storeys 15 to 17)
- #38 (storey 2)
- #38 (storey 4)
- #38 (storey 16)
- #38 (storey 18)
- #39 (storey 13)
- #39 (storey 14)
- #39 (storey 17)
- #39 (storey 18)
- #39 (storeys 4 to 6)
- #39 (storeys 15 to 16)
- #46 (storey 7)
- #46 (storeys 8 to 9)
- #46 (storeys 10 to 12)
- #49 (storeys 7 to 11)
- #50 (storey 2)
- #50 (storey 13)
- #50 (storey 14)
- #50 (storey 15)
- #50 (storey 18)
- #50 (storeys 3 to 6)
- #50 (storeys 16 to 17)
- #51
- #52 (storey 2)
- #52 (storeys 7 to 12)
- #53 (storey 2)
- #54 (storey 13)
- #54 (storey 14)
- #54 (storeys 3 to 6)
- #54 (storeys 16 to 17)
- #55 (storey 2)
- #55 (storeys 7 to 12)
- #56
- #57 (storey 2)
- #58
- #59 (storey 2)
- #59 (storey 6)
- #59 (storeys 4 to 5)
- #60 (storey 2)
- #61
- #62 (storey 2)
- #62 (storeys 3 to 6)
- #63 (storey 2)
- #64 (storey 2)
- #64 (storey 6)
- #64 (storeys 4 to 5)
- #65 (storey 2)
- #68 (storey 17)
- #68 (storey 18)
- #68 (storeys 4 to 6)
- #68 (storeys 13 to 14)
- #68 (storeys 15 to 16)
- #70 (storey 2)
- #70 (storey 19)
- #70 (storey 20)
- #70 (storey 24)
- #70 (storeys 3 to 6)
- #70 (storeys 13 to 18)
- #70 (storeys 21 to 23)
- #71 (storey 4)
- #71 (storey 17)
- #71 (storey 18)
- #71 (storey 19)
- #71 (storey 21)
- #71 (storey 24)
- #71 (storeys 5 to 6)
- #71 (storeys 7 to 12)
- #71 (storeys 13 to 14)
- #71 (storeys 15 to 16)
- #73 (storey 19)
- #73 (storey 21)
- #73 (storey 24)
- #73 (storeys 7 to 12)
- #74 (storey 2)
- #74 (storey 3)
- #74 (storey 16)
- #74 (storey 19)
- #74 (storey 20)
- #74 (storey 24)
- #74 (storeys 7 to 10)
- #74 (storeys 11 to 12)
- #74 (storeys 21 to 23)
- #75 (storeys 4 to 6)
- #75 (storeys 13 to 14)
- #75 (storeys 15 to 18)
- #77 (storey 2)
- #77 (storey 3)
- #77 (storeys 4 to 6)
- #77 (storeys 13 to 14)
- #77 (storeys 15 to 18)
- #78 (storey 16)
- #79 (storey 2)
- #79 (storeys 3 to 6)
- #79 (storeys 13 to 18)
- #81 (storey 17)
- #81 (storey 18)
- #81 (storeys 4 to 6)
- #81 (storeys 13 to 14)
- #81 (storeys 15 to 16)
Mid-height storey, after shading by neighbouring blocks. The tool above shows any storey.
Which The Interlace stacks take the afternoon sun most of the year?
46 stacks get an hour or more of direct sun after 2pm in at least ten months.
- #04 (storey 7)
- #04 (storey 12)
- #04 (storeys 8 to 11)
- #07
- #08 (storey 4)
- #08 (storey 17)
- #08 (storeys 7 to 12)
- #09 (storey 3)
- #09 (storey 13)
- #09 (storey 14)
- #09 (storey 18)
- #09 (storeys 4 to 6)
- #09 (storeys 15 to 17)
- #11
- #12 (storey 19)
- #12 (storey 21)
- #12 (storey 24)
- #13 (storey 19)
- #13 (storey 24)
- #13 (storeys 21 to 23)
- #14 (storey 3)
- #14 (storey 4)
- #14 (storey 18)
- #14 (storeys 5 to 6)
- #14 (storeys 13 to 14)
- #14 (storeys 15 to 17)
- #15 (storey 19)
- #15 (storey 21)
- #15 (storey 24)
- #16 (storey 24)
- #16 (storeys 13 to 14)
- #16 (storeys 15 to 18)
- #16 (storeys 21 to 23)
- #17 (storey 19)
- #18 (storey 2)
- #18 (storey 13)
- #18 (storey 16)
- #18 (storey 17)
- #18 (storey 18)
- #18 (storeys 3 to 6)
- #18 (storeys 14 to 15)
- #19 (storey 2)
- #19 (storey 4)
- #19 (storey 13)
- #19 (storey 14)
- #19 (storey 18)
- #19 (storeys 5 to 6)
- #19 (storeys 15 to 17)
- #20 (storey 2)
- #21 (storey 2)
- #22
- #23 (storey 2)
- #24 (storey 2)
- #24 (storey 13)
- #24 (storey 14)
- #24 (storey 18)
- #24 (storeys 4 to 6)
- #24 (storeys 15 to 17)
- #25
- #26 (storeys 7 to 11)
- #29 (storey 7)
- #29 (storeys 8 to 9)
- #29 (storeys 10 to 12)
- #35 (storey 13)
- #35 (storey 14)
- #35 (storeys 5 to 6)
- #35 (storeys 15 to 18)
- #36 (storey 2)
- #36 (storey 5)
- #36 (storey 14)
- #38 (storey 17)
- #38 (storeys 14 to 15)
- #40 (storeys 13 to 14)
- #40 (storeys 15 to 18)
- #47 (storey 12)
- #47 (storeys 7 to 9)
- #47 (storeys 10 to 11)
- #48 (storey 12)
- #48 (storeys 7 to 11)
- #50 (storey 12)
- #50 (storeys 7 to 9)
- #50 (storeys 10 to 11)
- #52 (storey 15)
- #52 (storey 18)
- #52 (storeys 4 to 6)
- #52 (storeys 13 to 14)
- #52 (storeys 16 to 17)
- #54 (storey 15)
- #54 (storey 18)
- #55 (storey 13)
- #55 (storey 14)
- #55 (storey 15)
- #55 (storey 18)
- #55 (storeys 4 to 6)
- #55 (storeys 16 to 17)
- #57 (storey 12)
- #57 (storeys 7 to 11)
- #59 (storey 12)
- #59 (storeys 7 to 11)
- #60 (storey 12)
- #60 (storeys 4 to 6)
- #60 (storeys 7 to 11)
- #66 (storey 2)
- #66 (storey 5)
- #66 (storey 6)
- #66 (storey 13)
- #66 (storey 14)
- #66 (storey 15)
- #66 (storey 18)
- #66 (storeys 3 to 4)
- #66 (storeys 16 to 17)
- #67 (storey 2)
- #67 (storey 13)
- #67 (storey 14)
- #67 (storeys 4 to 6)
- #67 (storeys 15 to 18)
- #68 (storey 2)
- #69 (storey 2)
- #70 (storey 7)
- #70 (storeys 8 to 12)
- #71 (storey 2)
- #71 (storey 3)
- #72
- #73 (storeys 13 to 18)
- #74 (storey 15)
- #74 (storey 17)
- #74 (storey 18)
- #74 (storeys 13 to 14)
- #75 (storey 7)
- #75 (storeys 8 to 12)
- #78 (storey 15)
- #78 (storey 17)
- #78 (storey 18)
- #78 (storeys 13 to 14)
- #80 (storey 3)
- #80 (storey 6)
- #80 (storeys 4 to 5)
- #80 (storeys 13 to 14)
- #80 (storeys 15 to 18)
Mid-height storey.
Which The Interlace stacks have the most open view?
32 stacks have a clear view across the whole window.
- #02
- #04 (storey 12)
- #04 (storeys 8 to 11)
- #05 (storey 6)
- #05 (storeys 3 to 5)
- #07
- #08 (storeys 7 to 12)
- #11
- #12 (storey 19)
- #12 (storey 21)
- #12 (storey 24)
- #13 (storey 19)
- #13 (storey 24)
- #13 (storeys 21 to 23)
- #15 (storey 19)
- #15 (storey 21)
- #15 (storey 24)
- #16 (storey 24)
- #16 (storeys 21 to 23)
- #17 (storey 19)
- #18 (storey 13)
- #18 (storey 16)
- #18 (storey 17)
- #18 (storey 18)
- #18 (storeys 14 to 15)
- #19 (storey 4)
- #19 (storey 13)
- #19 (storey 14)
- #19 (storey 18)
- #19 (storeys 5 to 6)
- #19 (storeys 15 to 17)
- #22 (storey 6)
- #22 (storey 13)
- #22 (storey 14)
- #22 (storey 18)
- #22 (storeys 3 to 5)
- #22 (storeys 7 to 9)
- #22 (storeys 10 to 12)
- #22 (storeys 15 to 17)
- #24 (storey 13)
- #24 (storey 14)
- #24 (storey 18)
- #24 (storeys 4 to 6)
- #24 (storeys 15 to 17)
- #25 (storeys 7 to 12)
- #26 (storeys 7 to 11)
- #29 (storey 7)
- #29 (storeys 8 to 9)
- #29 (storeys 10 to 12)
- #46 (storeys 4 to 6)
- #46 (storeys 10 to 12)
- #50 (storey 14)
- #50 (storey 15)
- #50 (storey 18)
- #50 (storeys 16 to 17)
- #51 (storey 14)
- #51 (storeys 15 to 18)
- #54 (storey 14)
- #54 (storeys 16 to 17)
- #56 (storeys 13 to 14)
- #56 (storeys 15 to 18)
- #62 (storey 7)
- #62 (storey 12)
- #62 (storeys 3 to 6)
- #62 (storeys 8 to 11)
- #65 (storeys 7 to 11)
- #67 (storey 12)
- #67 (storeys 7 to 11)
- #68 (storeys 7 to 12)
- #70 (storey 19)
- #70 (storey 20)
- #70 (storey 24)
- #70 (storeys 21 to 23)
- #71 (storey 19)
- #71 (storey 21)
- #71 (storey 24)
- #73 (storey 19)
- #73 (storey 21)
- #73 (storey 24)
- #74 (storey 19)
- #74 (storey 20)
- #74 (storey 24)
- #74 (storeys 21 to 23)
- #79 (storey 24)
Mid-height storey. Clear means all nine sight lines (±40° of the facing) pass no building as tall as the window within 400 m.
Which The Interlace stacks look straight at another block?
These face a building at least as tall as themselves, so no storey looks over it.
Block 226
- #01 (storey 6) · 57 m
- #01 (storeys 3 to 5) · 57 m
- #03 (storey 6) · 56 m
- #03 (storeys 3 to 5) · 56 m
- #10 (storey 12) · 68 m
- #10 (storeys 7 to 11) · 68 m
- #16 (storey 3) · 65 m
- #17 (storeys 5 to 6) · 70 m
- #40 (storey 12) · 56 m
- #40 (storeys 7 to 9) · 56 m
- #40 (storeys 10 to 11) · 56 m
- #70 (storey 7) · 56 m
- #70 (storeys 8 to 12) · 56 m
- #72 (storeys 7 to 12) · 64 m
Block 186
- #04 (storeys 3 to 6) · 54 m
- #09 (storeys 7 to 12) · 12 m
- #15 (storey 2) · 11 m
- #15 (storey 13) · 11 m
- #15 (storeys 3 to 6) · 11 m
- #15 (storeys 14 to 18) · 11 m
- #35 (storey 12) · 56 m
- #35 (storeys 7 to 9) · 56 m
- #35 (storeys 10 to 11) · 56 m
- #80 (storey 2) · 54 m
- #80 (storey 3) · 54 m
- #80 (storey 6) · 54 m
- #80 (storeys 4 to 5) · 54 m
- #80 (storeys 13 to 14) · 55 m
- #80 (storeys 15 to 18) · 54 m
- #81 (storey 2) · 57 m
Block 218
- #05 (storey 12) · 130 m
- #05 (storeys 7 to 11) · 130 m
- #43 (storey 2) · 51 m
- #44 (storey 2) · 55 m
- #44 (storey 6) · 55 m
- #44 (storeys 4 to 5) · 55 m
- #50 (storey 12) · 56 m
- #50 (storeys 7 to 9) · 56 m
- #50 (storeys 10 to 11) · 56 m
- #54 (storey 2) · 37 m
- #54 (storey 15) · 37 m
- #54 (storey 18) · 37 m
- #54 (storeys 7 to 12) · 20 m
- #60 (storeys 4 to 6) · 53 m
- #66 (storey 12) · 56 m
- #66 (storeys 7 to 11) · 56 m
- #70 (storey 2) · 12 m
- #70 (storeys 3 to 6) · 12 m
- #70 (storeys 13 to 18) · 12 m
- #76 (storey 19) · 11 m
- #76 (storey 21) · 11 m
- #76 (storey 24) · 12 m
Block 216
- #06 (storey 12) · 114 m
- #06 (storeys 7 to 11) · 114 m
- #17 (storey 18) · 128 m
- #17 (storeys 13 to 14) · 128 m
- #17 (storeys 15 to 17) · 128 m
- #57 (storey 12) · 57 m
- #57 (storeys 7 to 11) · 57 m
- #63 (storeys 4 to 6) · 56 m
- #69 (storeys 7 to 12) · 13 m
- #73 (storey 2) · 13 m
- #73 (storeys 3 to 6) · 13 m
- #73 (storeys 13 to 18) · 13 m
- #77 (storey 19) · 55 m
- #77 (storey 20) · 55 m
- #77 (storey 24) · 55 m
- #77 (storeys 21 to 23) · 55 m
Block 182
- #08 (storey 3) · 10 m
- #08 (storeys 5 to 6) · 11 m
- #13 (storeys 7 to 12) · 56 m
- #74 (storeys 4 to 6) · 130 m
Block 180
- #10 (storey 3) · 66 m
- #10 (storeys 4 to 6) · 63 m
- #71 (storey 2) · 53 m
- #71 (storey 3) · 53 m
- #72 (storeys 4 to 6) · 54 m
Block 188
- #12 (storey 3) · 12 m
- #12 (storey 13) · 12 m
- #12 (storeys 4 to 6) · 12 m
- #12 (storeys 14 to 18) · 12 m
- #23 (storey 12) · 55 m
- #23 (storeys 7 to 9) · 55 m
- #23 (storeys 10 to 11) · 55 m
- #31 (storey 2) · 51 m
- #31 (storey 6) · 54 m
- #31 (storeys 4 to 5) · 54 m
- #32 (storey 2) · 55 m
- #33 · 56 m
- #36 (storeys 7 to 12) · 6 m
- #39 (storey 2) · 53 m
- #40 (storey 2) · 56 m
- #40 (storey 4) · 54 m
- #40 (storeys 5 to 6) · 54 m
- #40 (storeys 13 to 14) · 56 m
- #40 (storeys 15 to 18) · 54 m
- #41 (storey 2) · 57 m
Block 198
- #12 (storeys 7 to 12) · 57 m
- #15 (storeys 7 to 12) · 6 m
- #20 (storey 4) · 54 m
- #20 (storeys 5 to 6) · 54 m
- #20 (storeys 13 to 14) · 55 m
- #20 (storeys 15 to 18) · 53 m
- #27 (storey 12) · 57 m
- #27 (storeys 7 to 11) · 57 m
- #28 (storey 12) · 55 m
- #28 (storeys 7 to 9) · 56 m
- #28 (storeys 10 to 11) · 55 m
- #30 (storey 2) · 23 m
- #30 (storey 6) · 20 m
- #30 (storeys 3 to 5) · 20 m
- #38 (storey 3) · 12 m
- #38 (storey 13) · 12 m
- #38 (storey 17) · 11 m
- #38 (storeys 5 to 6) · 11 m
- #38 (storeys 14 to 15) · 12 m
Block 214
- #13 (storey 3) · 127 m
- #13 (storeys 4 to 6) · 126 m
- #13 (storeys 13 to 14) · 127 m
- #13 (storeys 15 to 18) · 125 m
- #45 · 129 m
- #60 (storey 12) · 57 m
- #60 (storeys 7 to 11) · 57 m
Block 190
- #14 (storey 18) · 56 m
- #14 (storeys 5 to 6) · 56 m
- #14 (storeys 13 to 14) · 56 m
- #14 (storeys 15 to 17) · 56 m
- #24 (storeys 7 to 12) · 12 m
- #27 (storey 2) · 56 m
- #28 (storey 2) · 56 m
- #28 (storeys 4 to 6) · 56 m
- #29 (storey 2) · 56 m
Block 222
- #14 (storey 19) · 56 m
- #34 (storey 4) · 54 m
- #34 (storey 5) · 54 m
- #34 (storey 6) · 54 m
- #34 (storey 18) · 56 m
- #34 (storeys 13 to 14) · 56 m
- #34 (storeys 15 to 17) · 56 m
- #35 (storey 2) · 55 m
- #35 (storey 3) · 55 m
- #39 (storeys 7 to 12) · 12 m
- #75 (storey 7) · 55 m
- #75 (storeys 8 to 12) · 55 m
- #76 (storey 2) · 13 m
- #76 (storey 3) · 13 m
- #76 (storeys 4 to 6) · 13 m
- #76 (storeys 13 to 18) · 13 m
- #82 · 20 m
Block 184
- #14 (storeys 7 to 12) · 13 m
- #16 (storey 12) · 55 m
- #16 (storeys 7 to 11) · 55 m
- #78 (storey 15) · 130 m
- #78 (storey 17) · 130 m
- #78 (storey 18) · 130 m
- #78 (storeys 4 to 6) · 130 m
- #78 (storeys 13 to 14) · 130 m
Block 192
- #16 (storey 2) · 56 m
- #16 (storeys 4 to 6) · 56 m
- #16 (storeys 13 to 14) · 56 m
- #16 (storeys 15 to 18) · 56 m
- #19 (storeys 7 to 12) · 12 m
- #26 (storey 3) · 11 m
- #26 (storeys 5 to 6) · 11 m
Block 194
- #20 (storeys 7 to 9) · 56 m
- #20 (storeys 10 to 12) · 56 m
- #35 (storey 4) · 56 m
- #35 (storeys 5 to 6) · 56 m
Block 196
- #23 (storeys 4 to 6) · 63 m
- #36 (storey 2) · 36 m
- #36 (storey 5) · 36 m
Block 200
- #36 (storey 6) · 12 m
- #36 (storey 13) · 12 m
- #36 (storey 18) · 12 m
- #36 (storeys 3 to 4) · 12 m
- #36 (storeys 15 to 17) · 12 m
- #85 (storey 12) · 56 m
- #85 (storeys 7 to 11) · 56 m
Block 220
- #42 (storey 2) · 20 m
- #42 (storey 6) · 20 m
- #42 (storeys 3 to 5) · 20 m
- #47 (storey 12) · 56 m
- #47 (storeys 7 to 9) · 56 m
- #47 (storeys 10 to 11) · 56 m
- #48 (storey 12) · 57 m
- #48 (storeys 7 to 11) · 57 m
- #55 (storey 13) · 55 m
- #55 (storey 14) · 55 m
- #55 (storey 15) · 55 m
- #55 (storey 18) · 55 m
- #55 (storeys 4 to 6) · 55 m
- #55 (storeys 16 to 17) · 55 m
- #79 (storey 2) · 12 m
- #79 (storeys 3 to 6) · 12 m
- #79 (storeys 13 to 18) · 12 m
Block 206
- #46 (storey 3) · 12 m
- #55 (storeys 7 to 12) · 13 m
- #74 (storey 2) · 57 m
- #74 (storey 3) · 57 m
- #74 (storey 16) · 57 m
- #75 (storeys 4 to 6) · 57 m
- #75 (storeys 13 to 14) · 57 m
- #75 (storeys 15 to 18) · 57 m
Block 208
- #47 (storey 2) · 52 m
- #47 (storeys 4 to 6) · 54 m
- #48 (storey 2) · 56 m
- #53 (storeys 7 to 12) · 12 m
- #63 (storey 12) · 56 m
- #63 (storeys 7 to 11) · 56 m
- #71 (storey 4) · 56 m
- #71 (storey 17) · 56 m
- #71 (storey 18) · 56 m
- #71 (storeys 5 to 6) · 56 m
- #71 (storeys 13 to 14) · 56 m
- #71 (storeys 15 to 16) · 56 m
- #73 (storeys 7 to 12) · 20 m
Block 212
- #49 (storey 2) · 129 m
- #59 (storey 12) · 13 m
- #59 (storeys 7 to 11) · 13 m
- #71 (storeys 7 to 12) · 56 m
Hewlett-Packard Enterprise
- #50 (storey 2) · 49 m
- #50 (storey 13) · 49 m
- #50 (storeys 3 to 6) · 49 m
- #51 (storey 2) · 55 m
- #51 (storey 13) · 58 m
- #51 (storeys 4 to 6) · 58 m
- #52 (storey 2) · 59 m
- #53 (storey 2) · 61 m
- #54 (storey 13) · 77 m
- #55 (storey 2) · 70 m
- #56 (storey 2) · 67 m
- #56 (storey 12) · 73 m
- #56 (storeys 4 to 6) · 69 m
- #56 (storeys 7 to 11) · 73 m
- #57 (storey 2) · 64 m
- #58 (storey 2) · 44 m
- #58 (storey 6) · 44 m
- #58 (storeys 3 to 5) · 44 m
- #58 (storeys 7 to 11) · 47 m
- #61 (storey 7) · 59 m
- #61 (storeys 8 to 11) · 60 m
Block 202
- #52 (storeys 4 to 6) · 62 m
- #81 (storeys 4 to 6) · 55 m
Block 210
- #54 (storeys 3 to 6) · 12 m
- #64 (storey 12) · 12 m
- #64 (storeys 7 to 11) · 12 m
- #68 (storeys 4 to 6) · 57 m
- #74 (storeys 7 to 10) · 56 m
- #74 (storeys 11 to 12) · 56 m
Block 204
- #77 (storey 2) · 57 m
- #77 (storey 3) · 57 m
- #77 (storeys 4 to 6) · 57 m
Which The Interlace stacks face a pool?
Grouped by the pool each stack looks onto.
Water Park
- #01 (storey 6)
- #01 (storeys 3 to 5)
- #03 (storey 6)
- #03 (storeys 3 to 5)
- #05 (storey 12)
- #05 (storeys 7 to 11)
- #09 (storeys 7 to 12)
- #10 (storey 3)
- #10 (storey 12)
- #10 (storeys 4 to 6)
- #10 (storeys 7 to 11)
- #10 (storeys 13 to 14)
- #10 (storeys 15 to 18)
- #13 (storey 3)
- #13 (storeys 4 to 6)
- #13 (storeys 13 to 14)
- #13 (storeys 15 to 18)
- #70 (storey 7)
- #70 (storeys 8 to 12)
- #72 (storeys 7 to 12)
- #74 (storey 15)
- #74 (storey 17)
- #74 (storey 18)
- #74 (storeys 4 to 6)
- #74 (storeys 13 to 14)
- #76 (storey 2)
- #76 (storey 3)
- #76 (storeys 4 to 6)
- #76 (storeys 13 to 18)
- #77 (storey 19)
- #77 (storey 20)
- #77 (storey 24)
- #77 (storeys 21 to 23)
- #78 (storey 15)
- #78 (storey 17)
- #78 (storey 18)
- #78 (storeys 4 to 6)
- #78 (storeys 13 to 14)
- #80 (storey 19)
- #80 (storey 20)
- #80 (storey 24)
- #80 (storeys 21 to 23)
- #83 (storey 12)
- #83 (storeys 7 to 11)
Waterfall Terrace
- #08 (storey 4)
- #08 (storey 17)
- #09 (storey 3)
- #09 (storey 13)
- #09 (storey 14)
- #09 (storey 18)
- #09 (storeys 4 to 6)
- #09 (storeys 15 to 17)
- #12 (storey 19)
- #12 (storey 21)
- #12 (storey 24)
- #13 (storey 19)
- #13 (storey 24)
- #13 (storeys 21 to 23)
- #14 (storey 3)
- #14 (storey 4)
- #14 (storey 18)
- #14 (storeys 5 to 6)
- #14 (storeys 13 to 14)
- #14 (storeys 15 to 17)
- #16 (storey 12)
- #16 (storey 24)
- #16 (storeys 7 to 11)
- #16 (storeys 21 to 23)
- #17 (storey 19)
- #18 (storeys 7 to 12)
- #21 (storeys 7 to 9)
- #21 (storeys 10 to 12)
Counts when at least a quarter of the window looks onto water before another tower.
Which The Interlace stacks face a road?
None of the stacks has a bordering road within 80 m straight ahead.
Can I see the The Interlace floor plans?
Yes. Pick a stack and its floor plan shows beside the map, as the developer published it: 63 layouts, each with its size, the units it applies to and a key plan. Tap it to enlarge.
How this is worked out, and its limits
Stacks are traced from the developer’s site plan onto the map, and the sun and view are worked out against the buildings around them. Details are as at 2026-10-21 and can change.
Show the method and its limitsHide the method
Where the stacks are. Each stack’s outline is traced from the developer’s site plan and fitted to the land parcel on the map. Expect positions within a few metres and bearings within a few degrees. Unit types come from the developer’s unit charts and add up to the published unit mix, and the map uses those same colours; 258 of the 258 stacks are also named on the developer’s floor plans, and all of those match.
Facing. A mid-block stack faces away from the side of the block it sits on. End and corner stacks (marked “corner”) have windows on more than one side; 297 of them are not yet checked against the floor plan, so the tool uses the main facade.
What it looks onto. The pools, lawns, courts and pavilions are read off the developer’s site plan and placed on the map with the same fit as the stacks, so they are right to within a few metres. A stack “looks onto” a pool when at least a quarter of 17 sight lines across its window (40° either side of the facing) reach the water before another tower of the project. It “faces out of the estate” when the site boundary is within 50 m straight ahead. Facility names and positions are the developer’s and can change before completion.
Heights. Towers use the developer’s storey counts at an assumed 3.3 m per storey. Buildings standing around the estate use the height in the Singapore Land Authority’s 3D model, read off OneMap 3D on 2 October 2026; where one outline covers a tower and its podium, it is cut into its parts. A building not yet in that model (still being built) uses its published storey count at 3.6 m a storey for a condo and 3.0 m for an HDB block, the averages measured for built ones. Every building is modelled as its footprint raised straight up, on level ground: no roofs, balconies, trees or slopes.
Sun. The same solar model as the Sun Path & Facing Calculator, checked to within about three minutes, with a building in the way counted as shade. The window is a point at mid-storey height on the middle of the outside wall. Balconies, overhangs and cloud cut real sun further, so read the hours as a ceiling.
Sun across the year and coolest stacks. The year grid tests the window every half hour on the 15th of each month. Coolest stacks ranks by the average of those twelve days in hours of direct sun after 2pm, least first, at the middle storey of each stack with shade from other buildings taken off; the hours for the whole day sit beside it. For a home at the end of its block the afternoon figure also counts the sun on its end wall.
Floor plans. The developer’s own pages, unaltered, matched to each stack by the layout code on the developer’s schematic diagram. A stack the plan lists as a mirror unit is the plan flipped. Floor plans: Ankerite Pte Ltd, The Interlace floor plan books (Typical Units and Garden Units, 2014; the storey plan carrying each layout). Developer's plans, not to scale and subject to change; areas are approximate and subject to final survey.
Not shown. Asking prices: a resale home is priced by its owner, and what is on the market changes by the week. Anything the developer did not publish is not shown either. Details are as at 2026-10-21 and can change. Sources: Developer's floor plan book, Typical Units (Ankerite Pte Ltd, 2014); Developer's floor plan book, Garden Units (Ankerite Pte Ltd, 2014); Developer's CapitaLand Designer Series brochure (2016); Developer's site plan sheet (picture hosted on cos.sg); Developer's launch plan sheets, 2010 (pictures hosted on cos.sg); OpenStreetMap.