Compare Silversea layouts
46 layouts, 383 homes. Put two or three side by side: the plan, the size, what you gain and give up, and which way each stack faces.
Pick two or three layouts
The first one you pick is the one the others are measured against.
Measured against
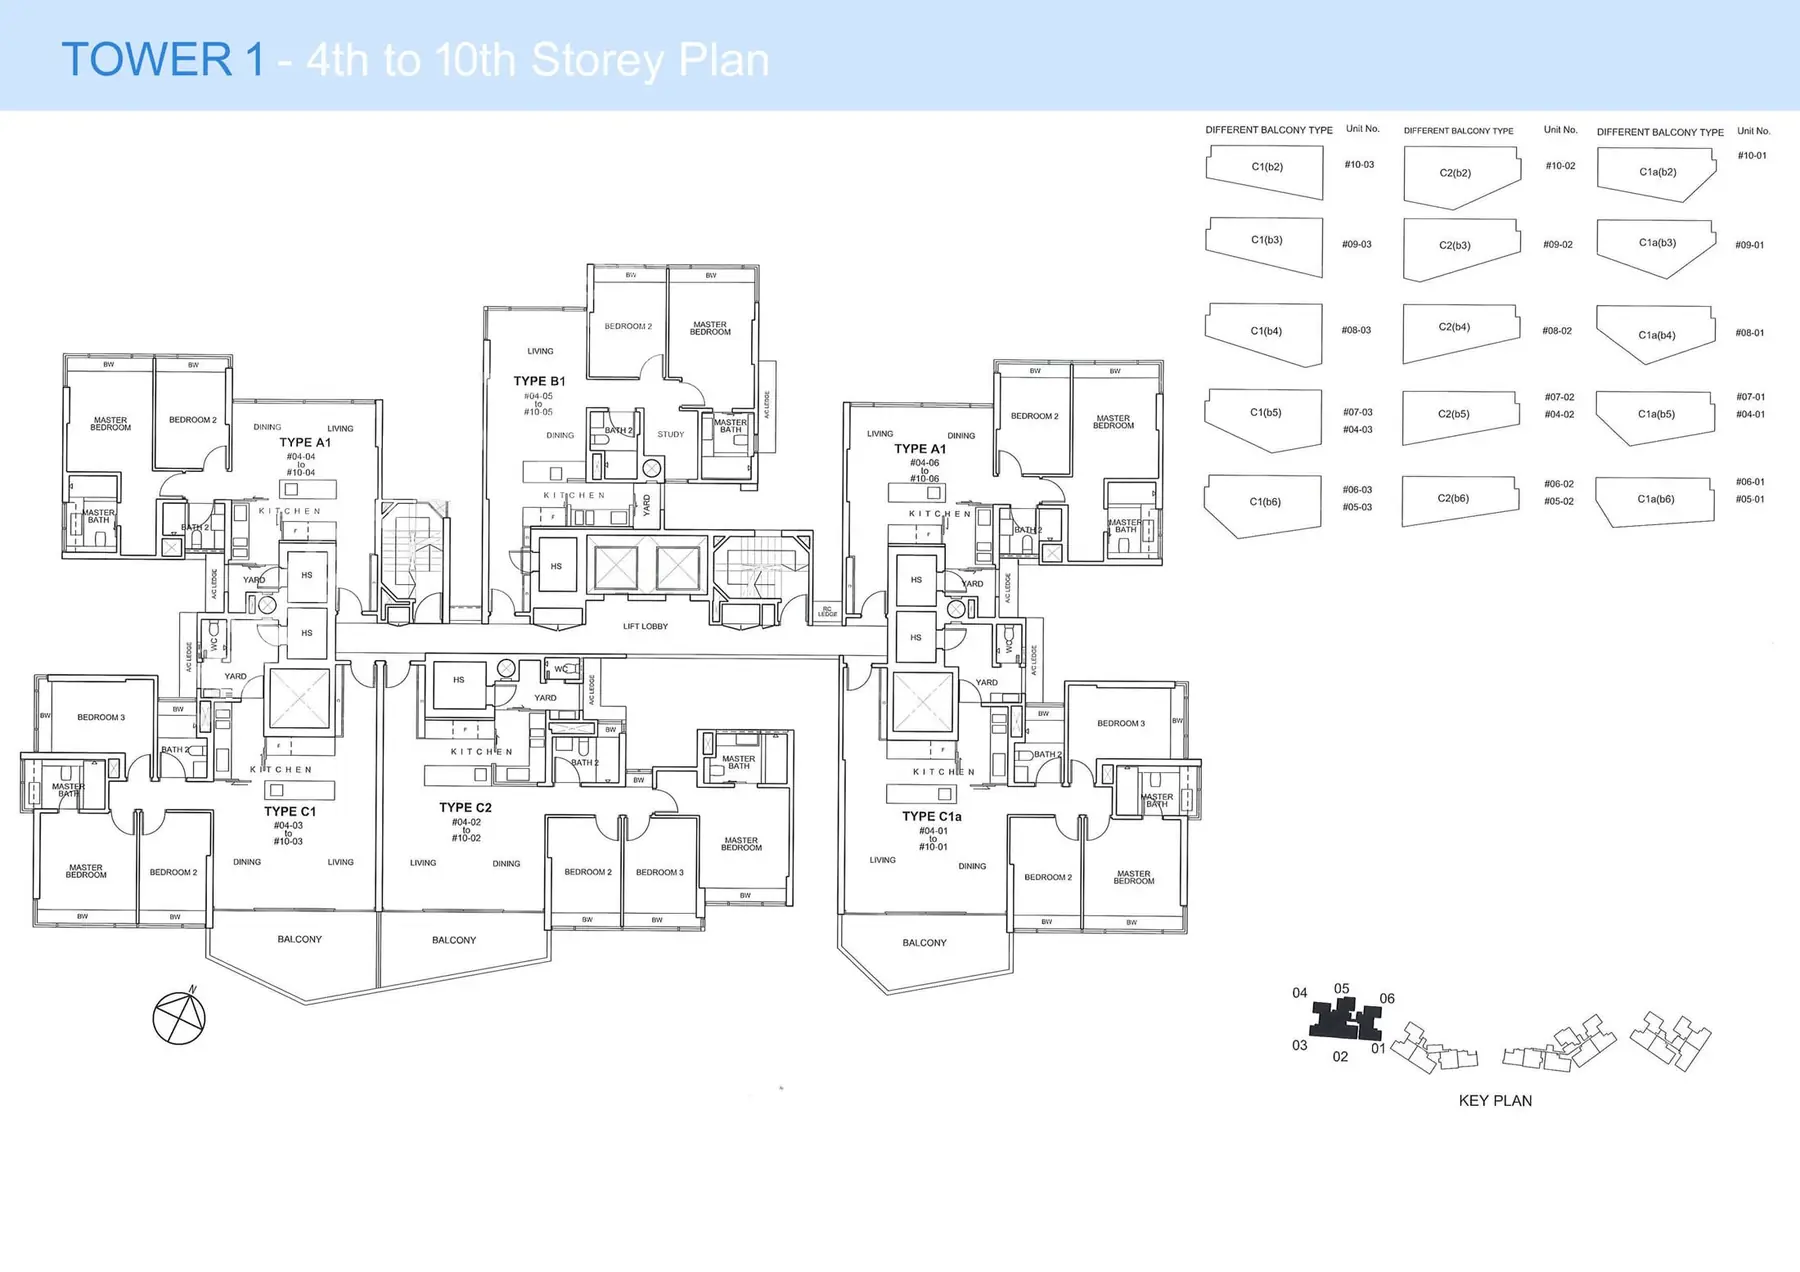
A1 (Tower 1, stack 04)
2-bed
- Size
- Not given
- Stacks
- 1 · 10 homes
Option 2
C1 (Tower 1, stack 03)
3-bed
- Size
- Not given
- Stacks
- 1 · 10 homes
Not drawn to the same scale. Tap a plan for the developer’s full page. Floor plans: the developer's sales book for Silversea (page scans). Each close-up is cut from the tower's whole-floor sheet, so the edge of the home next door may show. Developer's plans, subject to change.
C1 (Tower 1, stack 03) instead of A1 (Tower 1, stack 04)
You gain
- 1 more bedroom (3 against 2)
- Less afternoon sun at its coolest stack: #03 (storeys 1 to 10) gets 1.5h a day after 2pm, #04 gets 2.8h
You give up
Nothing the figures show against A1 (Tower 1, stack 04).
Where each layout faces
Every stack that carries each layout. Tap a stack to see that home on the map, its view and its sun by the hour.
| Stack | Faces | Looks onto | Sun after 2pm |
|---|---|---|---|
| #04Blk 1 · storeys 1 to 10 | NNW | Out of the estate: The Cape, 83 m | 2.8h |
| Stack | Faces | Looks onto | Sun after 2pm |
|---|---|---|---|
| #03 (storeys 1 to 10)Blk 1 · storeys 1 to 10 | SSE | East Coast Parkway, 79 m | 1.5h |
Sun is hours of direct sun a day after 2pm, averaged over the year at the middle storey of the stack, after shade from the buildings around it. Least sun first.
Every Silversea layout
Show all 46 layoutsHide the table
| Layout | Type | Size | Stacks | Faces |
|---|---|---|---|---|
| A1 (Tower 1, stack 04) | 2-bed | #04 | NNW | |
| A1 (Tower 1, stack 06) | 2-bed | #06 | NNW | |
| A1 (Tower 2, stack 11) | 2-bed | #11 | NNE | |
| A1 (Tower 3, stack 18) | 2-bed | #18 | WNW | |
| A1 (Tower 4, stack 23) | 2-bed | #23 | NNE | |
| A2 (Tower 2, stack 08) | 2-bed | #08 (storeys 1 to 10) | SSE | |
| A2 (Tower 3, stack 15) | 2-bed | #15 (storeys 1 to 10) | SSE | |
| A3 (Tower 4, stack 24) | 2-bed | #24 | NNE | |
| B1 (Tower 1, stack 05) | 2-bed | #05 | NNW | |
| B1 (Tower 3, stack 17) | 2-bed | #17 | WNW | |
| C1 (Tower 1, stack 03) | 3-bed | #03 (storeys 1 to 10) | SSE | |
| C1 (Tower 2, stack 10) | 3-bed | #10 (storeys 1 to 10) | S | |
| C1 (Tower 3, stack 12) | 3-bed | #12 (storeys 1 to 10) | ESE | |
| C1 (Tower 4, stack 19) | 3-bed | #19 (storeys 1 to 10) | ESE | |
| C1 (Tower 4, stack 22) | 3-bed | #22 (storeys 1 to 10) | SSW | |
| C1a (Tower 1, stack 01) | 3-bed | #01 (storeys 1 to 10) | SSE | |
| C2 (Tower 1, stack 02) | 3-bed | #02 (storeys 1 to 10) | SSE | |
| C2 (Tower 2, stack 09) | 3-bed | #09 (storeys 1 to 10) | S | |
| C2 (Tower 3, stack 13) | 3-bed | #13 (storeys 1 to 10) | ESE | |
| C2 (Tower 4, stack 20) | 3-bed | #20 (storeys 1 to 10) | ESE | |
| C2 (Tower 4, stack 21) | 3-bed | #21 (storeys 1 to 10) | SSW | |
| C2a (Tower 3, stack 14) | 3-bed | #14 (storeys 1 to 10) | SSE | |
| C3 (Tower 2, stack 07) | 3-bed | #07 | SSE | |
| C3 (Tower 3, stack 16) | 3-bed | #16 | SSE | |
| D1 (Tower 1, stack 02) | 3-bed | #02 (storeys 11 to 19) | SSE | |
| D1 (Tower 2, stack 09) | 3-bed | #09 (storeys 11 to 19) | S | |
| D1 (Tower 3, stack 13) | 3-bed | #13 (storeys 11 to 19) | ESE | |
| D1 (Tower 4, stack 20) | 3-bed | #20 (storeys 11 to 19) | ESE | |
| D1 (Tower 4, stack 21) | 3-bed | #21 (storeys 11 to 19) | SSW | |
| D1a (Tower 3, stack 14) | 3-bed | #14 (storeys 11 to 19) | SSE | |
| E1 (Tower 1, stack 03) | 4-bed | #03 (storeys 11 to 19) | SSE | |
| E1 (Tower 2, stack 10) | 4-bed | #10 (storeys 13 to 19) | S | |
| E1 (Tower 3, stack 12) | 4-bed | #12 (storeys 13 to 19) | ESE | |
| E1 (Tower 4, stack 22) | 4-bed | #22 (storeys 13 to 19) | SSW | |
| E1a (Tower 1, stack 01) | 4-bed | #01 (storeys 13 to 19) | SSE | |
| E2 (Tower 2, stack 08) | 4-bed | #08 (storeys 11 to 19) | SSE | |
| E2 (Tower 3, stack 15) | 4-bed | #15 (storeys 11 to 19) | SSE | |
| E3 (Tower 4, stack 19) | 4-bed | #19 (storeys 11 to 19) | ESE | |
| P1 (Tower 1) | 4-bed | #03 (storeys 20 to 21) | SSE | |
| P1 (Tower 3) | 4-bed | #12 (storeys 20 to 21) | ESE | |
| P1 (Tower 4) | 4-bed | #22 (storeys 20 to 21) | SSW | |
| P1a (Tower 1) | 4-bed | #01 (storeys 20 to 21) | SSE | |
| P2 (Tower 2) | 4-bed | #08 (storeys 20 to 21) | SSE | |
| P2 (Tower 3) | 4-bed | #15 (storeys 20 to 21) | SSE | |
| P4a (Tower 1) | 4-bed | #02 (storeys 20 to 21) | SSE | |
| P4b (Tower 3) | 4-bed | #14 (storeys 20 to 21) | SSE |
Frequently asked questions
How many layouts does Silversea have?
Silversea has 46 layouts across its 383 homes: 10 2-bed, 20 3-bed, 16 4-bed. The developer's floor plan is on this page for 46 of them.
Which Silversea layout gets the least afternoon sun?
Type C1 (Tower 3, stack 12) in stack #12 (storeys 1 to 10), facing ESE: about 0.0 hours of direct sun a day after 2pm, averaged over the year at the middle storey and after shade from the buildings around it. The same layout in another stack can face a different way, so compare stack by stack.
Not sure which layout suits you?
We’ll talk you through the Silversea layouts, the homes on the market and recent prices. Leave your details and we’ll WhatsApp you.
Or write to us first: WhatsApp us